Various settings such as the exposure mode and white balance can be set to suit the shooting conditions.
* Only the image size can be changed when shooting videos.
-
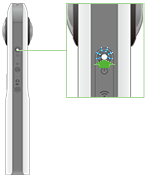
Press the power button on the camera to turn the power on
- To change the video shooting conditions, press the shooting mode button to switch to the video capture mode.

-
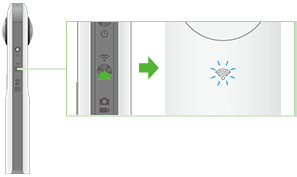
Press the wireless button to turn the wireless function on

- The wireless lamp flashes white.
- This does not need to be done if the wireless lamp flashes white when the power is turned on.
-
Select the SSID of the camera in the Wi-Fi settings of the smartphone
- When the wireless connection is complete, the wireless lamp lights white.
- Start the smartphone application
-
Tap the shooting mode button in the lower right-hand corner of the screen to change the exposure mode
- Auto:
- ISO sensitivity, shutter speed and white balance are adjusted automatically according to the shooting environment. You can also select the image correction method from noise reduction, DR correction and HDR rendering. The camera returns to this mode each time the power is turned on.
- ISO priority:
- Set the ISO sensitivity and white balance.
- Shutter priority:
- Set the shutter speed and white balance.
- Manual:
- Set the ISO sensitivity, shutter speed and white balance.
- Select each setting
- Move your finger over each setting value to select your desired settings.
- The section displayed in white is the current setting.
- Below are the setting ranges and options that can be selected for each setting.
- ISO sensitivity:
- 100 - 1600
- Shutter speed:
- 1/8 - 1/8000 (shutter priority mode), 60 - 1/8000 (manual mode)
- White balance:
 Auto - Adjusted automatically.
 Outdoor - Adjusted for shooting outdoors (when sunny).
 Shade - Adjusted for shooting in the shade.
 Cloudy - Adjusted for shooting when cloudy.
 Incandescent light 1 - Adjusted for shooting in incandescent light.
 Incandescent light 2 - Adjusted for shooting in incandescent light.
(More red remains than when using [Incandescent light 1].) Daylight color fluorescent light - Adjusted for shooting in daylight color fluorescent light.
 Natural white fluorescent light - Adjusted for shooting in natural white fluorescent light.
 White fluorescent light - Adjusted for shooting in white fluorescent light.
 Light bulb color fluorescent light - Adjusted for shooting in lightbulb color fluorescent light.
- Tap EV, and use the displayed slider to correct the exposure. Move it to the right to brighten the photo or to the left to darken the photo.
Caution
- If the shutter speed is set slower than 1/8 second in manual mode, a sound is heard both at the start of and end of shooting. If images are shot with noise reduction set in auto mode, a sound is heard both at the start of and end of shooting. At this time, images are not saved if the power is turned off before shooting is complete.
- When shooting in auto mode with the noise reduction or HDR rendering settings, fix the camera in place using a tripod when shooting to prevent camera shake.
Note
- Shooting condition settings are retained until the power is turned off or the settings are reconfigured.
- You can only shoot in auto mode when shooting video. Settings such as the ISO sensitivity, shutter speed, white balance and exposure cannot be configured.
Changing the Still Image Capture Mode Settings
Tap  at the top right of the screen when shooting still images to change various settings for the still image capture mode.
- Display mode:
- You can set the display method for live view.
[OFF]: Live view is not displayed.
[Panorama]: Live view is displayed as a panorama at the top of the screen.
[Full Screen]: Live view is displayed on the full screen. - Interval shooting:
- You can set "Interval shooting" which shoots at a fixed interval. Touch the button next to [Interval shooting] to turn this setting on and configure settings such as the shooting interval.
- Setting Range
Shooting Interval: 5 seconds - 60 minutes for 5376 x 2688 size images, 5 seconds - 60 minutes for 2048 x 1024 size images
Total shots: 2 - 200, not specified - Post view:
- You can set whether or not to display the image after shooting.
- Image size:
- Select the still image size.
- Self-timer:
- Select the countdown time.