This section explains the shooting method using the self-timer function.
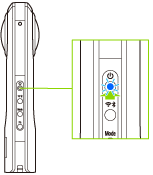
- Turn on the power of the camera.

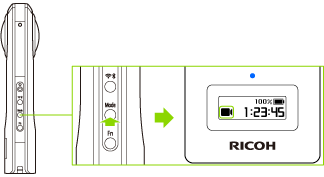
- Press the mode button to select the video shooting mode.

 appears on the OLED panel.
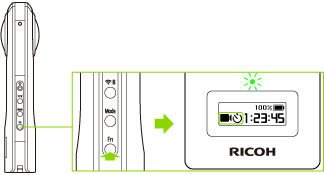
- Press the Fn button to turn the self-timer function on.

- The camera status lamp lights green, and

 appears on the OLED panel.
- The camera status lamp lights green, and
- Place the camera.
- Press the shutter button to start the self-timer.
- Countdown starts and shooting is started 5 seconds later.
- During countdown, the camera status lamp flashes green and the countdown sound is heard. Also, the remaining time is displayed on the OLED panel.
(When the remaining time is less than 2 seconds, flashing of the lamp becomes quicker. When flashing becomes quicker, the countdown sound interval also becomes shorter.) 
 appears on the OLED panel during video recording.
- Press the shutter button again to stop shooting.
- The recorded video is saved in the internal memory of the camera.
Note
- Videos saved in the internal memory of the camera can be viewed on a smartphone or computer.
- Videos saved in the internal memory of the camera can be deleted using the basic app for smartphone.
- The default countdown time is 5 seconds.
- If the shutter button is pressed during countdown, shooting can be performed immediately.
(The self-timer is canceled.) - To cancel the self-timer, press the mode button.
(If the remaining countdown time is less than 2 seconds, the self-timer cannot be canceled.) - The countdown sound volume is linked to the shutter sound volume.
(When the shutter sound is off, the countdown sound is off either.) - The following operations are not available with the basic app for smartphone while recording videos.
- Viewing images in the camera
- Transferring images from the camera
- Deleting images from the camera
- The date and time of the camera are synchronized with the smartphone or computer when the camera is connected to the basic app.
Caution
- Orientation information may not be recorded correctly if the camera is tilted when shooting.
- If you press and hold the power button and wireless button simultaneously to forcibly turn off the power of the camera while recording a video, the internal memory may become damaged and may no longer be able to save data.
- Videos may not be transferred to a smartphone depending on the video settings.
- Videos may not be played back on a smartphone or computer depending on the video settings.
- The camera may become hot when recording videos for a long period of time. In this case, the camera may stop operating to prevent damage from high temperatures.
Camera Status Lamp
Some lighting statuses of the camera status lamp show that it is not possible to shoot. Refer to the following and check the status of the camera.
- Lit in blue:
- The camera is ready for shooting.
- Flashing in blue:
- The camera is starting up.
- Flashing in red:
- An error has occurred in the camera.
- Lit in green:
- The self-timer function can be used for shooting.
- Flashing in green:
- The self-timer function is on.
- Unlit:
- Shooting is not possible as the camera is in the sleep mode, no more images can be captured, or no more recordable time remains. The lamp is also unlit in the light/sound off mode or during shooting.
Note
- The camera automatically enters the sleep mode if no operations are performed for a set period of time (default setting: 3 minutes). Shooting is not possible in the sleep mode. Press the power button to enable shooting, and then press the shutter button to perform shooting.
- Orientation information may not be recorded correctly if a magnet or other magnetic item is placed near the camera.
- If no more images can be captured, delete images from the camera.