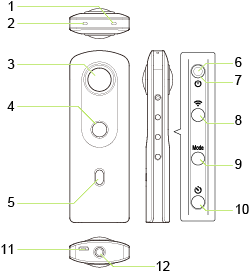
This section explains the names and functions of the buttons, lamps, etc. on the camera.

-
Speaker
-
Microphone
-
Lens
Caution
- Be careful when handling the lens section to avoid damage.
-
Shutter button
Press to capture images.
-
OLED panel
Displays the shooting mode, battery level, etc.
-
Power lamp
Indicates the power status. (Details)
-
Power button
Turns the power on and off.
-
Wireless button
Turns on and off the wireless LAN function (Details) and Bluetooth® function (Details).
-
Mode button
Switches the shooting mode.
-
Self-timer button
Switches the shooting method between “Normal shooting” and “Self-timer shooting”. Connects the camera to the Remote Control TR-1 when the button is pressed and held.
-
USB terminal (Micro-B)
Used to connect the camera to a computer via the provided USB cable. (Details)
Caution
- It may take time for the battery to charge or the battery may not charge at all when a USB cable other than the provided USB cable is used.
-
Tripod mount hole
Caution
- When using the tripod, take care not to overtighten the screw.
Information Displayed on the OLED Panel

-
Communication status
 : Wireless LAN function set to on
 : Bluetooth® function set to on
 -
Shooting mode
 : Still image shooting mode
 : Video shooting mode
 ,
,  ,
,  : Preset shooting mode (You can change the preset shooting mode according to the shooting scene using the basic app for smartphone.)
 : During video recording
 : Camera unit high-temperature warning (Details)
 : Memory capacity warning
 : Error
 -
Battery level / Self-timer status / Bluetooth® accessory connection status
 to
to  : Battery level (100% to 0%)
 : Battery error
 : Self-timer shooting
 : Remote Control TR-1 connected
 : Processing
Note
- The countdown is displayed on the entire OLED panel during the self-timer shooting.